This video was recorded right after Christmas at my future in-laws house in Maine. Henry wasn't completely comfortable with his new boots...

Friday, February 27, 2009


Tuesday, February 24, 2009
Cinnamon Chicken?

Yup. You read that right: cinnamon chicken. I was a little weary to combine the two ingredients, but really, it turned out quite well.
After reading in various periodicals that cinnamon is both an appetite suppressant and quite good for you, I was ready to try it on chicken. Here's what an article in Women's Health magazine had to say: "Research has linked the copper-colored stuff with reduced blood sugar, cholesterol, and triglyceride levels in people with type 2 diabetes, and a recent study published in the American Journal of Clinical Nutrition found that adding a little more than a teaspoon to rice pudding even helped tame blood sugar in people without diabetes." Even more of a reason to add more cinnamon to my diet.
Cat Cora, of Food Network fame had this recipe published in the latest issue of Health magazine. I modified it slightly (mainly just by using boneless, skinless chicken breasts, omitting the wine and by halving the recipe) and then served it over some delicious tinkyada brown rice pasta. Here's a play by play of what I did.
Cinnamon Chicken (gluten-free, dairy-free)
serves two for dinner
1 tsp cinnamon, salt & pepper
2 tablespoons olive oil
2 boneless, skinless chicken breasts
1 yellow onion, chopped
3 garlic cloves, minced
3/4 cup water
3/4 cup chicken broth
3 tbs tomato paste
1 teaspoon dried oregano
First, mix the cinnamon, salt and pepper in a bowl and rub chicken with cinnamon seasoning. Then heat the olive oil in a deep skillet over medium high heat. Brown chicken for 4-5 minutes. Lower heat to medium high, add onions and garlic and cook for about three minutes. Then add 1/4 cup of broth to pan and scrape down chicken and onion bits. When the stock has evaporated, add the water, rest of broth, tomato paste, oregano and more garlic. Cover and simmer for one hour. You should be left with two perfectly cooked chicken breasts and lots of tasty sauce.
 Henry couldn't keep his eyes off of it.
Monday, February 23, 2009
Broccoli Soup
 I remember in college that I would sometimes indulge in the Velveeta-yellow, broccoli and cheese soup that my cafeteria offered. It was good and filling and on a cold New England day it was downright perfection.
On a chilly day last week I had a craving for that soup, so when I saw two packages of frozen chopped broccoli on sale for $1 at the grocery store, I knew I had to attempt it. And I'm sure glad I did.
This soup, with no cheese, no dairy, no nutritional yeast flakes (often found in vegan dishes to mimic "cheesiness") is somehow creamy and almost cheesy. I attribute it to the rice flour roux, blending of the soup and long simmer time of the recipe. I ate it right out of the pot. Then I had it warm for dinner. And the next day I had it cold for breakfast. I've gotta make these cheap dishes more often.
 "Creamy"Broccoli Soup (gluten-free, dairy-free, vegan)
serves 4
1 large yellow onion, chopped
3 tablespoons olive oil
3 tablespoons rice flour
2 packages of 10 oz frozen, chopped broccoli slightly thawed
2 cups water plus one vegetarian bouillon cube (or vegetable stock)
freshly cracked salt and pepper (about 1 teaspoon each)
1 teaspoon ground garlic (or 2 cloves of fresh garlic)
In a saucepan on medium heat, add the olive oil. Then add the onion and saute for at least five minutes. Next, add the rice flour to create a roux. With a whisk keep mixing the flour/olive oil/onion mixture until it gets light brown (about five minutes). Then one and a half boxes of the broccoli, salt, pepper and garlic and saute a bit more. Then add the water or stock. Bring to a boil and turn the heat down and continue to simmer. Next, I used my immersion blender and blended the soup until creamy, then I added the rest of the broccoli to make it more of a hearty soup. If you like it creamier, then blend all the broccoli. Simmer for another twenty minutes, adjust seasonings and serve.
Friday, February 20, 2009
Photo Phriday: Baby Skype

While skyping with my sister, bro-in-law and niece this past weekend my sister pointed out that the meal she was eating was made up of two of my recipes: kale and pulled pork. Which of course meant that I had to take a picture of it with my adorable niece in the background.
Hooray for skype for keeping families connected!

Hooray for skype for keeping families connected!
Thursday, February 19, 2009
Sweet and Sour Pork
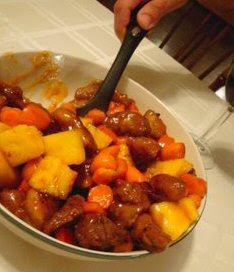 Going out to eat for Chinese food is often tricky in the gluten-free world. Many foods are made with soy sauce, which in most cases, is made from wheat. Fortunately, restaurants like P.F. Changs have gluten-free menus and do a great job at making their food available to all. But it's still nice to have a few Chinese (well, Americanized Chinese) dishes in your repertoire. Here's one of my favorites -- made just a bit healthier.
 This is a typical sweet and sour pork recipe. It doesn't call for anything particularly fancy, except for agave which is my preferred sweetener (but you can certainly use sugar). Also, my sister recently made the recipe with tofu instead of pork -- making it easy to convert vegan as well. Also, instead of being served over rice, the A-man and I opted to serve it over lightly sauteed shredded cabbage; a now favorite option of mine.
Sweet and Sour Pork (gluten-free, dairy-free)
Serves 2 for dinner
About 2 pounds of pork tenderloin (or drained, extra firm tofu), cubed
1/2 cup cornstarch
1/2 cup canola or grapeseed oil
1 cup cubed fresh or canned pineapple
1/2 chopped yellow onion/pepper/carrot (optional)
for the sauce:
3/4 cup water
1/2 cup agave
2 tablespoons rice vinegar
2 teaspoons cornstarch
2 teaspoons gluten-free soy sauce
In a wok or skillet over medium heat, add the oil -- make sure it doesn't smoke. Meanwhile, add the cornstarch to a large ziploc bag then the pork and shake until evenly coated. Fry the pork until crispy in small batches and drain on paper towels. Meanwhile, in a small saucepan add all of the sauce ingredients and whisk together. Bring to a boil and then let simmer for a few minutes. Adjust agave and vinegar if desired. Add the pork back into the wok, then add the pineapple and vegetables, then the sauce. Stir to combine and serve over rice or lightly sauteed shredded cabbage.

Tuesday, February 17, 2009
You Know You Have a Chocolate Addiction When...

1. You require a square of dark chocolate after breakfast.
2. You immediately go to the grocery store to buy more chocolate when you see that you only have one bar left.
3. You always have chocolate in your carry on luggage during trips in case you can't find any vegan dark chocolate during your layover.
My name is Liz. And I have a chocolate addiction.
Fortunately for me, the one holiday that condones this addiction just passed. So, in order to get this out of my system, I must purge my Valentine's Day recipes.
This is the first time in six years that the A-man and I have spent Valentine's Day together and we celebrated with cooking, eating, talking about our future together and... doing yard work (he's going to give me hard time for pointing that last one out). But truly, I felt grateful that we were able to spend the day, and the weekend together and that we were both able to bask in the glory that is chocolate goodness.
This is the first time in six years that the A-man and I have spent Valentine's Day together and we celebrated with cooking, eating, talking about our future together and... doing yard work (he's going to give me hard time for pointing that last one out). But truly, I felt grateful that we were able to spend the day, and the weekend together and that we were both able to bask in the glory that is chocolate goodness.
We had a wonderful chocolate souffle:

The recipe for the souffle was downright easy. While I was attempting to put together an eggplant tartine, I asked the A-man to prep the egg-whites and yolks for the souffle. He did that, and because the eggplant dish took so darn long to make, he finished the souffle for me. We used Sara Moulton's recipe verbatim and what do you know -- it's naturally gluten-free and if you use vegan chocolate, dairy free as well. It was light, yet decadent. Just sweet enough. And the perfect ending to our hours-long to make meal. We topped ours with fresh raspberries.
The next night we enjoyed delicious chocolate covered strawberries:
 This is the simplest dessert out there. Because of my addiction, I dip a lot of things in chocolate, so I've become pretty in tune with what works and what doesn't, and strawberries -- they're at the top of the list. I usually take the easy route and place my chocolate (in this case 3/4 cup dairy-free chocolate chips) in a glass bowl and add about a teaspoon of shortening. Then I microwave for one minute and stir and continue to microwave at thirty second increments. Be careful because once it burns, it's gonzo. The shortening seems to give the chocolate a better gloss and makes it less likely to turn chalky once it hardens. Then I dip the strawberries (make sure they are super dry or else the chocolate won't stay) in the chocolate and place on parchment paper and place in the refrigerator for at least twenty minutes.
 This is the simplest dessert out there. Because of my addiction, I dip a lot of things in chocolate, so I've become pretty in tune with what works and what doesn't, and strawberries -- they're at the top of the list. I usually take the easy route and place my chocolate (in this case 3/4 cup dairy-free chocolate chips) in a glass bowl and add about a teaspoon of shortening. Then I microwave for one minute and stir and continue to microwave at thirty second increments. Be careful because once it burns, it's gonzo. The shortening seems to give the chocolate a better gloss and makes it less likely to turn chalky once it hardens. Then I dip the strawberries (make sure they are super dry or else the chocolate won't stay) in the chocolate and place on parchment paper and place in the refrigerator for at least twenty minutes.
And then I eat them all.
I'm working on that last part.
Wednesday, February 11, 2009
Banana Nut (Coconut Flour) Muffins
 I've spoken about the health benefits of coconut flour here before: it's high in fiber, low in carbs and just plain delicious. And I've certainly made it known that I adore banana bread: my mother's banana bread is something I dream about. But I had yet to combine the two -- I didn't know what I was missing.
 I made these last night and based the recipe from the Tiana Organic Coconut Flour website. I added more banana (a tip my mother always told me when making banana bread), reduced the egg by one, used agave instead of sugar, omitted the almond extract and doubled the vanilla. Well, and made them muffins instead of bread.
The result is a tasty breakfast or dessert muffin that's both moist and sweet.
 Banana Nut Muffins (gluten-free, dairy-free, vegetarian)
makes 12 regular sized muffins
2 ripe bananas, mashed
7 eggs
1/2 hemp milk (or cow's, almond, coconut...)
1/2 cup agave nectar
1 teaspoon vanilla extract
1/2 teaspoon salt
3/4 coconut flour, sifted (this is a must -- coconut flour clumps easily)
1 teaspoon baking powder
3/4 cup pecans or walnuts, chopped
Preheat oven to 325 F. Spray muffin tin with cooking spray. Combine the bananas, eggs, milk, agave, vanilla and salt in a bowl. In a separate bowl, combine the sifted coconut flour and baking powder. Slowly add the wet ingredients into the dry and mix until all lumps are gone. Then, fold in the nuts. Pour evenly in muffin tins and bake for 20-25 minutes. Let cool for a few minutes before transferring to a rack. This is a picture of a photo shoot gone wrong. Normally taking photos of food gives me an opportunity to work with Henry on his ability to "sit" and "stay." Today, Henry could not deal with having the muffins at eye level and stole a half while I was attempting to photograph it.
Oh Henry.
Subscribe to:
Posts (Atom)